Episode #80 Using a Time-Out to Keep Patients Safe During NORA
January 11, 2022
Welcome to the next installment of the Anesthesia Patient Safety podcast hosted by Alli Bechtel. This podcast will be an exciting journey towards improved anesthesia patient safety.
Today, we are leaving the operating rooms and headed over, up, or down to non-operating room anesthesia sites, so let’s go! Our featured article today is from the October 2021 APSF Newsletter called, “Time-Out Checklists Promote Safety in Nonoperating Room Anesthesia (NORA)” by Candance Chang and Ryan Dudley.
Here is an example of a time-out checklist for NORA that the authors include in their article.
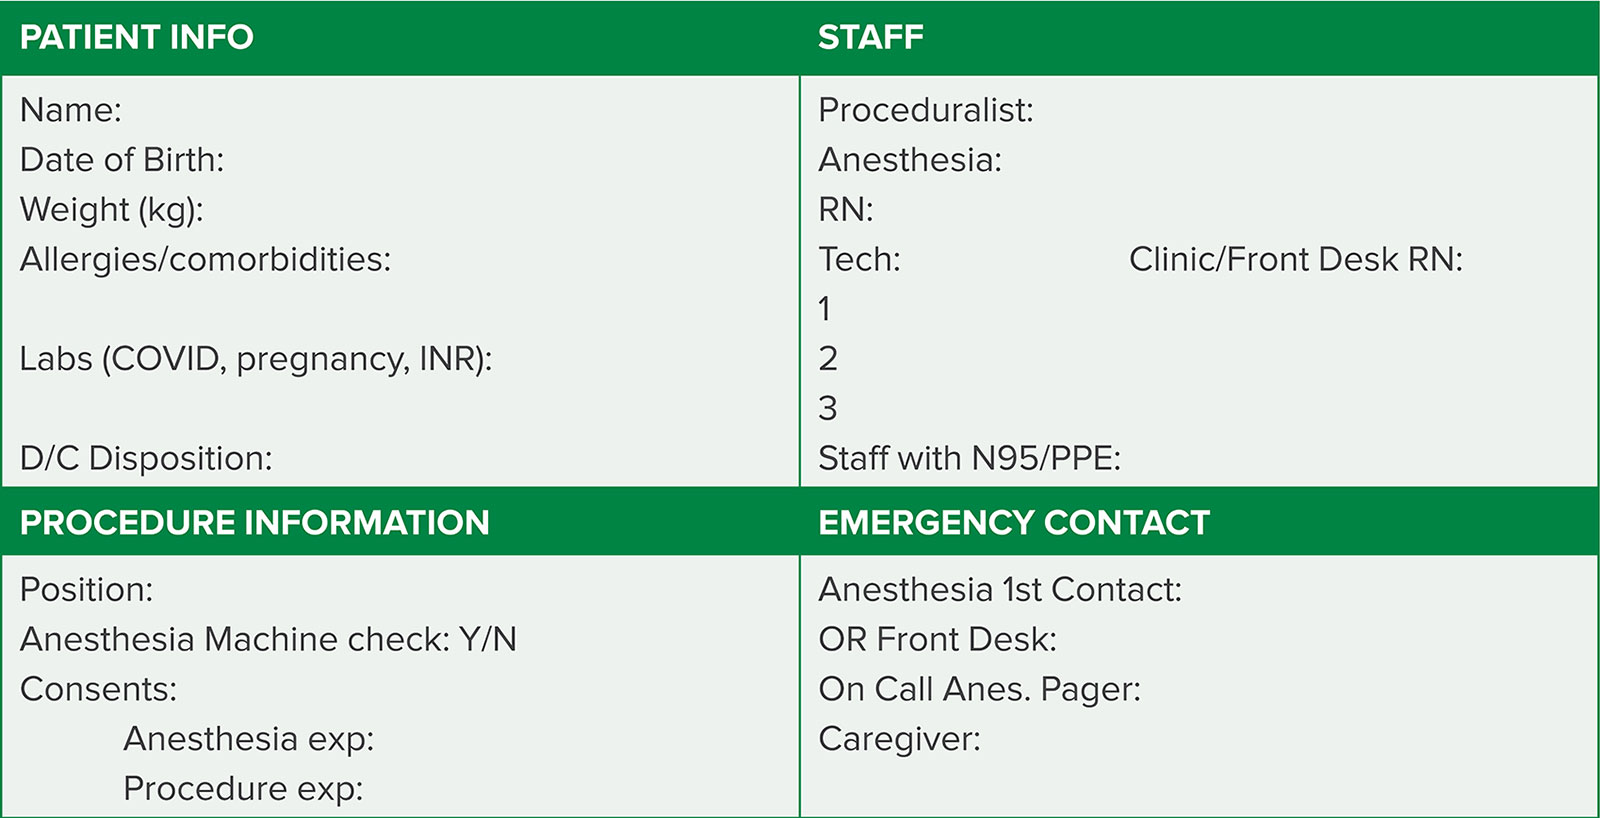
Figure 1. Example of a NORA time-out checklist, showing the four main categories: patient, procedure, team members, and emergency contact.
Next up, we remain at our off-site, NORA location and discuss a case from our Articles between Issues section from August 25, 2021. The article is, “Massive Hemoptysis – A Rare but Catastrophic Complication” by Candance Chang and Nathaniel Richins.
Be sure to check out the APSF website at https://www.apsf.org/
Make sure that you subscribe to our newsletter at https://www.apsf.org/subscribe/
Follow us on Twitter @APSForg
Questions or Comments? Email me at [email protected].
Thank you to our individual supports https://www.apsf.org/product/donation-individual/
Be a part of our first crowdfunding campaign https://www.apsf.org/product/crowdfunding-donation/
Thank you to our corporate supporters https://www.apsf.org/donate/corporate-and-community-donors/
Additional sound effects from: Zapsplat.
© 2022, The Anesthesia Patient Safety Foundation
Hello and welcome back to the Anesthesia Patient Safety Podcast. My name is Alli Bechtel, and I am your host. Thank you for joining us for another show. Today, we are leaving the operating rooms and headed over, up or down to non-operating room anesthesia sites, so let’s go!
Before we dive into the episode today, we’d like to recognize Edwards Lifesciences, a major corporate supporter of APSF. Edwards Lifesciences has generously provided unrestricted support to further our vision that “no one shall be harmed by anesthesia care”. Thank you, Edwards Lifesciences – we wouldn’t be able to do all that we do without you!”
Okay, we made it to the non-operating room anesthesia, or NORA, location and it is time to introduce our featured article for today. It is, “Time-Out Checklists Promote Safety in Nonoperating Room Anesthesia (NORA)” by Candance Chang and Ryan Dudley. To follow along with us, head over to APSF.org and click on the Newsletter heading. First one down is the current issue. Then, scroll down looking at the right-hand column until you see our featured article today. I will include a link in the show notes as well.
Does your practice involve non-operating room anesthesia? This type of practice involves a wide variety of procedures and anesthesia care, but today we are going to focus on adopting time-out checklists which are used in many operating room settings to be used prior to non-operating room anesthesia to help keep patients safe. Just because we are not in the operating room does not mean that we can let down our guard when it comes to keeping patients safe during anesthesia care.
The authors start off the article by introducing time-out checklists which have been implemented in operating rooms around the world and are used routinely prior to surgical procedures leading to decreased morbidity and mortality. Currently, timeout check lists in NORA locations is not routine and this is a threat to anesthesia patient safety especially since there are challenges in these off-site locations that include the following:
- Ineffective team dynamics
- Remote location from assistance
- Unfamiliar procedures
- Physical obstacles in the work environment
- And older patients with more comorbidities when compared to patients in the operating room
For non-operating room anesthesia, the time-out checklist is vital to ensure patient safety, but it needs to be modified for use outside the ORs. The authors provide the example of timing for the completing the timeout. In the OR, the timeout is often completed after the patient is positioned, prepped, and draped, but prior to incision. For NORA, the ideal time for completing the timeout may be when the patient is still able to participate and prior to induction of anesthesia or sedation. This will help to optimize communication between the entire team.
So, what does this checklist look like? The authors share the checklist that they use in their institution, and it has 4 essential categories including patient, procedure, team, and emergency response. Let’s take a closer look at each of these categories.
First up, is the Patient category. This section will likely need to include patient identifying information, weight, and allergies. Depending on the patient and institution, you may also want to consider including pregnancy status, Covid-19 status, and coagulation studies. It is also important to review the discharge plan – whether the patient will go to a designated recovery area prior to discharge home on the same day or will go to the PACU before a planned admission following the procedure. If the patient will be admitted following the procedure, it is important to identify the primary care team who is responsible to admitting the patient.
The next section is the Procedure section. It is important to review the following:
- Patient positioning
- Length of the intervention
- Potential complications
- Anticipated post-procedural pain. This step is especially important if the anesthesia professional is not experienced with the procedure. It is a good idea to clarify this ahead of time to be prepared especially for patients who may be going home after the procedure.
For patients who require general anesthesia, this is time to discuss correct positioning and appropriate padding, DVT prophylaxis, and temperature management. This step is especially important for members of the healthcare team who are not familiar with these interventions during general anesthesia care for the procedure.
The third category is the Team. This is the time for introductions between the members of the procedural team and the anesthesia professionals with the goal to facilitate communication (it is easier to ask for help or equipment when you know the names and roles of the other people in the room) as well as team work. The introductions should include everyone in the room, the doctors, nurses, and technicians with their name, role and time for questions. Before moving on to the next category, it is crucial that everyone in the room understand the plan for the procedure and anesthesia.
The final category is Emergency Response. Remember, these NORA locations are often far away from additional anesthesia professionals who can responds in case of an emergency as well as additional equipment that may only be needed in an emergency. Make sure that the team knows where the code cart and malignant hyperthermia cart are located. Another option is the display contact numbers for additional help and equipment in the room, on a white board or poster so that someone else in the room can call for help in an emergency when the anesthesia professional is busy taking care of the patient.
Now, that sounds like a lot of information to cover, and it could be time consuming if it were not organized with clear expectations for the appropriate information to cover during the time-out. You may want to consider using a large whiteboard or poster with prompts for all of the components of the checklist. The visual cues are necessary for an effective time-out that accomplishes the following goals: shared understanding of plan of care, active participation between team members, and maintain access to this information throughout the procedure. The time-out is not just a checklist to complete and move-on, but it ensures that this information is available to members of the team throughout the procedure. It may be helpful to review the checklist to confirm the patient’s allergies or weight or discharge plan at different times throughout the procedure. Check out Figure 1 in the article for an example of a NORA Time-out Checklist and I will include this in the show notes as well.
We are not leaving the non-operating room anesthesia site yet. It is important to keep in mind that developing a time-out checklist for these off-site locations is more than just a checklist and a whiteboard. It requires buy-in from the stakeholders including the proceduralists, anesthesia professionals, nurses, and technicians…and even the patient to be an effective tool for improved patient safety. Once the NORA time-out has been implemented, it is time to gather feedback from everyone on the healthcare team and modify the time-out protocol as needed. Another important step is to check on compliance with performing the time-out. This is something that should be done in a uniform approach at all NORA locations. Keep in mind that this is not just an anesthesia time-out. It is important to determine who should lead the time-out at the NORA locations whether it is the anesthesia professional, proceduralist or circulating nurse and it is just as important that everyone is paying attention during the entire time-out.
The authors highlight why the time-out at NORA locations is so important – it can help to prevent complications, establishes effective teamwork and communication from the beginning, and ensures that everyone on the team knows what to do during an emergency response. This time-out is an important step towards keeping patients safe during non-operating room anesthesia procedures. We want to know if this is something that you have implemented at your institution. So, after you are done listening to this podcast, go ahead and tag us on twitter @APSForg using the hashtag #APSFpodcast!
Before we wrap up for today, we are going to remain at our off-site, NORA location and discuss a case from our Articles between Issues section from August 25, 2021. The article is, “Massive Hemoptysis – A Rare but Catastrophic Complication” by Chang and Richins. To follow along with us, head over to APSF.org and click on the Newsletter heading. Second one down is Articles Between Issues. Then, scroll down until you get to August 25, 2021 and our featured article.
Let’s get started with the case. This is an 85-year-old otherwise healthy man with a peripheral pulmonary nodule who underwent moderate sedation for a CT-guided biopsy. The patient tolerated the sedation and procedure well until he developed mild coughing at the end of the case. As he was being moved from the CT scanner to the stretcher, the coughing worsened with new hemoptysis. At this point, the anesthesia professional asked the CT staff to call for additional help, but the CT staff were unsure who to call. (Remember, this is the type of communication confusion that the NORA Time-out helps to address before it is emergent!!) The patient’s respiratory status worsened and as soon as an anesthesia tech arrived with a video laryngoscope, the anesthesia professional induced general anesthesia and attempted intubation which was unsuccessful due to significant blood in the oropharynx. The next step involved an emergency cricothyrotomy performed by the anesthesia professional to establish an airway. Unfortunately, there was continued hemorrhage from the cricothyrotomy incision and despite resuscitative attempts, the patient expired within minutes. This is a devastating outcome. Massive hemoptysis is a rare complication following interventional radiology or bronchoscopy procedures with a high mortality rate of about 13%. We must remain vigilant and be ready to act fast and this coordinated, rapid response may need to include healthcare professionals from interventional radiology, pulmonology, thoracic surgery, and critical care in order to improve outcomes and save lives.
We have so much more to discuss with this case and in this article. So, you will have to tune in next week because we are going to kick off the show with part 2 of this article. But before we wrap up for today, let’s review the Massive Hemoptysis Protocol for CT/IR. Check it out in Table 1 from the article.
Here we go. The first part of the protocol is communication with includes the following components.
- Activate Staff Assist button in CT to alert IR, OR, and Anesthesia Professionals and Technicians.
- Then, there are several calls to make.
- IR support with the request, “Bring the code cart to CT”
- Emergency Anesthesia Professional
- Anesthesia Technicians to bring massive hemoptysis toolbox.
- Thoracic Surgery
- Pulmonology
- Blood Bank to release emergency blood
- And ICU
- Importantly, this is not the time to hit Code Blue unless specifically instructed to do so.
The next part of the protocol is the Procedure section. Here are the crucial steps.
- One person assigned to continuous suction.
- Perform a quick CT to visualize the hemorrhage.
- Quickly bring the patient out of the scanner and over to the stretcher for intubation.
- Utilize a portable monitor for vital signs if needed.
- Place large bore IV access. This may even be IO access.
The heading for the third section is Anesthesia. Here is what the Anesthesia professionals are responsible for during this emergency response.
- Perform emergent intubation with mainstem placement of endotracheal tube on the contralateral side of the biopsy and bleeding if possible. Other methods for lug isolation may be necessary including bronchial blocker or double lumen tube. If lung isolation is not successful, jet ventilation may be necessary.
- Position patient depending on lung isolation: If no lung isolation, bleeding side down. If lungs are isolated, bleeding side up.
- Add maximal PEEP in order to help decrease bleeding.
- Here are the supplies that the anesthesia tech will need to bring as part of this response protocol: Video laryngoscope, fiberoptic bronchoscope, Massive hemoptysis toolbox (Don’t worry, we will review the contents of the toolbox next week!), IV set up with IV fluids and blood transfusion tubing, Jet ventilator, arterial line pressure bag set up and transducer, and rapid infuser.
The final section of the protocol is hemorrhage. These are the steps for the protocol.
- IR physician to place femoral arterial line first, followed by large bore central venous access if not already obtained.
- Draw type and cross sample
- Anesthesia tech to set up blood transfusion tubing.
- Send runner to blood bank for blood to transfuse. This may need to be emergency release blood.
- Discussion of treatment of bleeding between IR, Pulmonology, and thoracic Surgery.
- Consider transfer to ICU for further stabilization for less severe hemorrhage.
There is a lot of teamwork and communication required for this emergency response. We hope that you will join us next week as we dive further into the Massive Hemoptysis Protocol.
If you have any questions or comments from today’s show, please email us at [email protected]. Please keep in mind that the information in this show is provided for informational purposes only and does not constitute medical or legal advice. We hope that you will visit APSF.org for detailed information and check out the show notes for links to all the topics we discussed today.
Happy 2022! We hope that you will continue to listen all year long! Plus, we would love to connect with you on Instagram, Facebook, Twitter, and Linked In this year so go ahead and like our next post on Instagram, tag us in a patient safety related tweet on twitter, or like our next post on Facebook. Let’s keep the conversation going as we work towards improved anesthesia patient safety.
Until next time, stay vigilant so that no one shall be harmed by anesthesia care.
© 2022, The Anesthesia Patient Safety Foundation
